结合源码记录 vue2 完整的响应式更新页面的周期
概览
先给出整体流程图, 大概有个印象
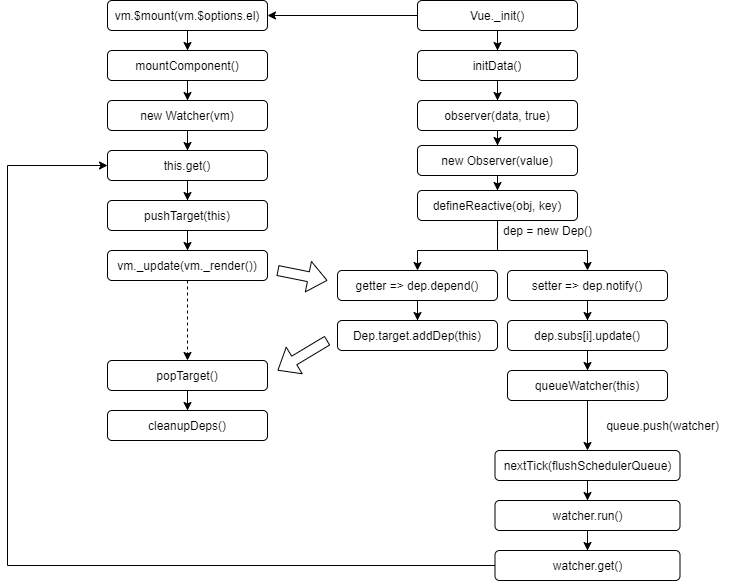
初始化阶段
在Vue初始化阶段, _init方法执行时, 会调用initState(vm)方法
1
2
3
4
5
6
7
8
9
|
Vue.prototype._init = function (options) {
var vm = this;
initState(vm);
initProvide(vm);
callHook(vm, 'created');
};
|
initState方法主要是对props, methods, data, computed 和 wathcer等属性做了初始化操作.
1
2
3
4
5
6
7
8
9
10
11
12
13
14
15
16
17
18
|
export function initState (vm: Component) {
vm._watchers = []
const opts = vm.$options
if (opts.props) initProps(vm, opts.props)
if (opts.methods) initMethods(vm, opts.methods)
if (opts.data) {
initData(vm)
} else {
observe(vm._data = {}, true )
}
if (opts.computed) initComputed(vm, opts.computed)
if (opts.watch && opts.watch !== nativeWatch) {
initWatch(vm, opts.watch)
}
}
|
可以看到, 当opts.data存在时就调用了initData(vm)方法, initData方法主要干了一件事. 监听对象, 调用observe方法.
1
2
3
4
5
6
7
8
9
10
11
12
13
14
15
16
17
18
19
|
function initData (vm: Component) {
const keys = Object.keys(data)
let i = keys.length
while (i--) {
const key = keys[i]
if (props && hasOwn(props, key)) {
} else if (!isReserved(key)) {
proxy(vm, `_data`, key)
}
}
observe(data, true )
}
|
这边顺便提一句, 为什么当我们在data中定义了属性后, 可以通过this.xxx的形式访问到这些属性. 因为在初始化data时, 会调用proxy(vm, '_data', key), 再看proxy方法的实现.
1
2
3
4
5
6
7
8
9
10
|
export function proxy (target: Object, sourceKey: string, key: string) {
sharedPropertyDefinition.get = function proxyGetter () {
return this[sourceKey][key]
}
sharedPropertyDefinition.set = function proxySetter (val) {
this[sourceKey][key] = val
}
Object.defineProperty(target, key, sharedPropertyDefinition)
}
|
target就是vm实例, 实际也是拦截vm的get方法, 代理到vm._data下获取属性. 也就是说当调用this.xxx时, 实际获取的值是this._data.xxx
言归正传. 当调用observe方法时, 数据响应式的一大主角就登场了.
Observer
1
2
3
4
5
6
7
8
9
10
11
12
13
14
15
16
17
18
19
|
export function observe (value: any, asRootData: ?boolean): Observer | void {
if (hasOwn(value, '__ob__') && value.__ob__ instanceof Observer) {
ob = value.__ob__
} else if (
shouldObserve &&
!isServerRendering() &&
(Array.isArray(value) || isPlainObject(value)) &&
Object.isExtensible(value) &&
!value._isVue
) {
ob = new Observer(value)
}
if (asRootData && ob) {
ob.vmCount++
}
return ob
}
|
每个data在初始化后都会插入一个属性__ob__, 用来访问对应的Observer对象, 当data.__ob__不存在时就会去创建对象new Observer(value)
1
2
3
4
5
6
7
8
9
10
11
12
13
14
15
16
17
18
19
20
21
22
23
24
25
|
export class Observer {
value: any;
dep: Dep;
vmCount: number;
constructor (value: any) {
this.value = value
this.dep = new Dep()
this.vmCount = 0
def(value, '__ob__', this)
if (Array.isArray(value)) {
} else {
this.walk(value)
}
}
walk (obj: Object) {
const keys = Object.keys(obj)
for (let i = 0; i < keys.length; i++) {
defineReactive(obj, keys[i])
}
}
}
|
Observer的constructor方法中调用了this.walk(value), walk方法中又遍历调用了defineReactive方法.
我们都知道vue2的响应式的原理是利用了API Object.defineProperty, 其实就是在这个方法中使用的.
1
2
3
4
5
6
7
8
9
10
11
12
13
14
15
16
17
18
19
20
21
22
23
24
25
26
27
28
29
30
31
|
export function defineReactive (
obj: Object,
key: string,
val: any,
customSetter?: ?Function,
shallow?: boolean
) {
const dep = new Dep()
const getter = property && property.get
const setter = property && property.set
let childOb = !shallow && observe(val)
Object.defineProperty(obj, key, {
enumerable: true,
configurable: true,
get: function reactiveGetter () {
const value = getter ? getter.call(obj) : val
if (Dep.target) {
dep.depend()
}
return value
},
set: function reactiveSetter (newVal) {
dep.notify()
}
})
}
|
去除其余逻辑, 发现defineReactive方法其实干了三件事.
1
2
3
4
5
6
7
8
| Object.defineProperty(obj, key, {
get: ()=>{
if (Dep.target) {
dep.depend()
}
return value
}
})
|
1
2
3
4
5
| Object.defineProperty(obj, key, {
set: ()=>{
dep.notify()
}
})
|
Dep
Dep实际上就是管理Watcher的一个工具类. 定义很简单.
1
2
3
4
5
6
7
8
9
10
11
12
13
14
15
16
17
18
19
20
21
22
23
24
25
26
27
28
29
30
31
32
|
export default class Dep {
static target: ?Watcher;
id: number;
subs: Array<Watcher>;
constructor () {
this.id = uid++
this.subs = []
}
addSub (sub: Watcher) {
this.subs.push(sub)
}
removeSub (sub: Watcher) {
remove(this.subs, sub)
}
depend () {
if (Dep.target) {
Dep.target.addDep(this)
}
}
notify () {
const subs = this.subs.slice()
for (let i = 0, l = subs.length; i < l; i++) {
subs[i].update()
}
}
}
|
Dep.target是Dep的静态属性, 也是将Watcher与Dep连接起来的关键.
当通过getter方法获取数据时, 调用dep.depend()方法, 实际就是调用Dep.target.addDep(this), 将dep添加给Watcher对象.而Watcher.addDep方法中, 又会调用dep.addSub(this)将Watcher添加给dep.subs
1
2
3
4
5
6
7
8
9
10
11
|
Watcher.prototype.addDep = function addDep (dep) {
var id = dep.id;
if (!this.newDepIds.has(id)) {
this.newDepIds.add(id);
this.newDeps.push(dep);
if (!this.depIds.has(id)) {
dep.addSub(this);
}
}
};
|
当通过setter方法修改数据时, 调用dep.notify()方法, 实际就是遍历dep.subs也就是与其绑定的所有Watcher并调用update()方法
结合上面的defineReactive方法可以理解成
1
2
3
4
5
6
| Object.defineProperty(obj, key, {
get: ()=>{
}
})
|
1
2
3
4
5
| Object.defineProperty(obj, key, {
set: ()=>{
}
})
|
另外说明下, 一个Dep实例可以添加给多个watcher, 同时一个Watcher实例也可以添加多个Dep.
1
2
3
4
5
6
| export default class Watcher{
deps: Array<Dep>
}
export default class Dep{
subs: Array<Watcher>;
}
|
收集依赖
现在问题的焦点来到Dep.target上. Dep.target到底是怎么维护的, 我们知道是个Watcher, 并且是全局只维护的唯一一个对象, 它是什么时候被赋值的, 需要更新视图时, 又是如何拿到并更新视图的?
先看Watcher对象是何时创建的.对Watcher的理解根据其用途其实可以分几种, 比如用户watcher, computed watcher及data watcher, 我们主要看的是data watcher.
回到上面说的Vue初始化时会调用this._init方法, _init方法会调用vm.$mount开始创建并渲染组件
1
2
3
4
5
6
7
8
9
|
Vue.prototype._init = function (options) {
var vm = this;
callHook(vm, 'created');
if (vm.$options.el) {
vm.$mount(vm.$options.el);
}
};
|
1
2
3
4
5
6
7
8
|
Vue.prototype.$mount = function (
el?: string | Element,
hydrating?: boolean
): Component {
el = el && inBrowser ? query(el) : undefined
return mountComponent(this, el, hydrating)
}
|
实际就是调用了mountComponent方法
1
2
3
4
5
6
7
8
9
10
11
12
13
14
15
16
17
18
19
20
21
22
23
24
25
26
27
28
29
|
export function mountComponent (
vm: Component,
el: ?Element,
hydrating?: boolean
): Component {
vm.$el = el
callHook(vm, 'beforeMount')
let updateComponent
updateComponent = () => {
vm._update(vm._render(), hydrating)
}
new Watcher(vm, updateComponent, noop, {
before () {
if (vm._isMounted && !vm._isDestroyed) {
callHook(vm, 'beforeUpdate')
}
}
}, true )
if (vm.$vnode == null) {
vm._isMounted = true
callHook(vm, 'mounted')
}
return vm
}
|
找到了, mountComponent中新建了Watcher对象!
也就是说, 当组件创建过程中, 会新建一个Watcher对象. 那又合适将watcher赋值给Dep.target呢?
Watcher类的constructor方法中会调用this.get方法
1
2
3
4
5
6
7
8
9
10
11
12
13
14
| export default class Watcher{
constructor (
vm: Component,
expOrFn: string | Function,
cb: Function,
options?: ?Object,
isRenderWatcher?: boolean
) {
this.value = this.lazy
? undefined
: this.get()
}
}
|
watcher.get方法中就是我们需要的答案
1
2
3
4
5
6
7
8
9
10
11
12
13
14
15
|
get () {
pushTarget(this)
try {
value = this.getter.call(vm, vm)
} catch (e) {
} finally {
popTarget()
}
return value
}
|
先调用pushTarget(this), 接着调用this.getter.call(vm, vm), 最后调用popTarget()
1
2
3
4
5
6
7
8
9
10
11
12
13
|
Dep.target = null
const targetStack = []
export function pushTarget (target: ?Watcher) {
targetStack.push(target)
Dep.target = target
}
export function popTarget () {
targetStack.pop()
Dep.target = targetStack[targetStack.length - 1]
}
|
this.getter就是初始化时传入的第二个参数
1
2
3
4
5
|
updateComponent = () => {
vm._update(vm._render(), hydrating)
}
new Watcher(vm, updateComponent, noop, {}, true)
|
而vm._update就是组件的渲染过程, 期间自然会访问属性的getter方法. 自然也就会触发dep.depend()来收集依赖. 所以watcher.get方法也可以简化为
pushTarget(this)
vm._update(vm._render())
popTarget()
触发依赖
以上是收集依赖的过程, 也就是getter方法的流程. 那么当更新数据时, 又是如何触发依赖使页面更新的呢?
上面说过了, 当修改数据时会触发属性的setter方法并调用dep.notify方法.
1
2
3
4
5
| Object.defineProperty(obj, key, {
set: ()=>{
dep.notify()
}
})
|
而dep.notify又会遍历属性subs去遍历跟当前dep绑定上的所有watcher去调用watcher.update()方法.
1
2
3
4
5
6
| notify () {
const subs = this.subs.slice()
for (let i = 0, l = subs.length; i < l; i++) {
subs[i].update()
}
}
|
update方法接着调用了queueWatcher方法
1
2
3
4
5
6
7
8
9
10
11
12
|
export default class Watcher {
update () {
if (this.lazy) {
this.dirty = true
} else if (this.sync) {
this.run()
} else {
queueWatcher(this)
}
}
}
|
queueWatcher方法中将watcher添加给一个任务队列数组queue, 并在下一个nextTick时遍历queue并调用watcher.run方法
1
2
3
4
5
6
7
8
9
10
11
12
13
14
15
16
17
18
19
20
21
22
23
24
25
26
27
28
29
30
31
32
33
34
35
|
export function queueWatcher (watcher: Watcher) {
const id = watcher.id
if (has[id] == null) {
has[id] = true
if (!flushing) {
queue.push(watcher)
} else {
let i = queue.length - 1
while (i > index && queue[i].id > watcher.id) {
i--
}
queue.splice(i + 1, 0, watcher)
}
if (!waiting) {
waiting = true
nextTick(flushSchedulerQueue)
}
}
}
function flushSchedulerQueue () {
queue.sort((a, b) => a.id - b.id)
for (index = 0; index < queue.length; index++) {
watcher = queue[index]
watcher.run()
}
}
|
而watcher.run方法, 又会再次调用this.get方法, 回到上面的流程.
1
2
3
4
5
6
|
run () {
const value = this.get()
}
|
最终再次设置dep.target, 最终更新视图
1
2
3
| pushTarget(this)
vm._update(vm._render())
popTarget()
|
 莽夫
莽夫